
If you have been in the Cisco networking world for any length of time then you have probably used CDP (Cisco Discovery Protocol) or LLDP (Link Layer Discovery Protocol) at least once or twice to figure out how two or more devices are connected together. CDP and LLDP can be very useful when it is not possible to physically trace cables between devices.
You may also have noticed that Cisco’s ASA firewall does not support either of those discovery protocols; and that can make it very difficult to discover to what the firewall physically connects. The discovery protocols are removed from the family of firewalls due to security concerns, as CDP and LLDP can leak specific information about the device.
One of the other methods to discover a physical port-to-port mapping is to start tracking down MAC addresses by looking at the MAC address on the firewall, and trying to track it down to a port on your switches. This method can be very time consuming, especially if the firewall connects to a device to which you do not have access.
The “Solution”
There is, however, a “workaround” to be able to see CDP neighbors on an ASA (if you really get stuck).
This can be accomplished by performing a “raw data” capture on a firewall interface (be careful doing this on a busy high-speed interface as it can load down your firewall quite quickly) and exporting that file for viewing with a traffic analyser (Wireshark in this case).
Check it Out!
Step 1:
Start a raw-data capture on the firewall interface that connects to the unknown switch or router and check to make sure the capture session is capturing traffic.
ciscoasa#
ciscoasa#  capture CAPTURE1 type raw-data interface backup
ciscoasa#
ciscoasa#
ciscoasa# show capture
capture CAPTURE1 type raw-data interface backup [Capturing - 290 bytes]
ciscoasa#
ciscoasa#
ciscoasa#
Step 2:
While the capture session is running, export it to a file on the NVRAM and check the storage to make sure it copied through OK. Then end the session so it doesn’t keep using up the firewall’s resources.
ciscoasa#
ciscoasa#
ciscoasa#
ciscoasa# copy /pcap capture:CAPTURE1 disk0:CAPTURE1.pcap

Source capture name [CAPTURE1]?

Destination filename [CAPTURE1.pcap]?
!!!
82 packets copied in 0.10 secs
ciscoasa#
ciscoasa#
ciscoasa#
ciscoasa#
ciscoasa#
ciscoasa#
ciscoasa# dir

Directory of disk0:/

15     drwx  32768        22:03:08 Nov 07 2011  coredumpinfo
102    -rwx  31039488     22:04:42 Nov 07 2011  asa842-smp-k8.bin
126    -rwx  9299         12:04:17 Jul 27 2014  CAPTURE1.pcap

2049605632 bytes total (1968963584 bytes free)
ciscoasa#
ciscoasa#
ciscoasa#
ciscoasa# no capture CAPTURE1
ciscoasa#
ciscoasa#
ciscoasa# show capture
ciscoasa#
ciscoasa#
Step 3:
Copy the exported file to your PC using TFTP (or your file transfer protocol of choice).
ciscoasa#
ciscoasa#
ciscoasa# copy disk0: tftp:

Source filename []? CAPTURE1.pcap

Address or name of remote host []? 172.27.252.16

Destination filename [CAPTURE1.pcap]?
!!!
9299 bytes copied in 8.180 secs (1162 bytes/sec)
ciscoasa#
ciscoasa#
ciscoasa#
Step 4:
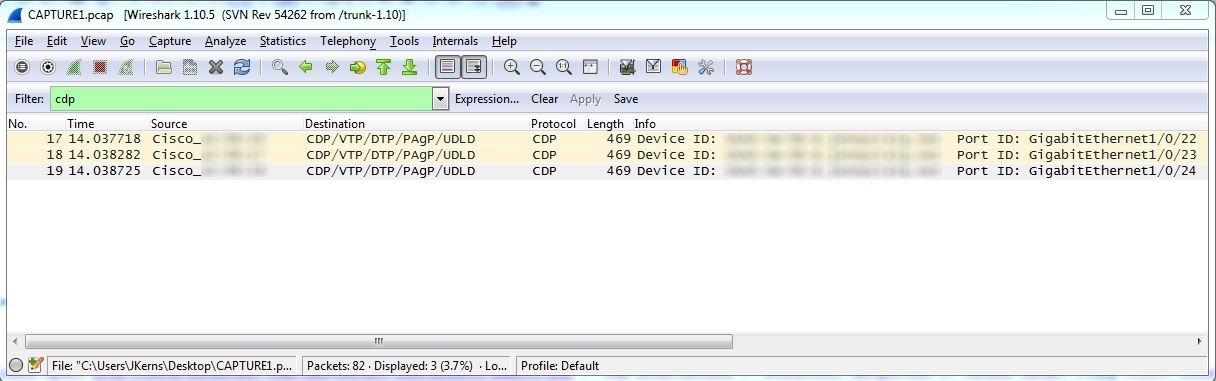
Open the file on your PC with Wireshark and filter the traffic for CDP or LLDP frames (type “cdp” or “lldp” in the display filter field).
*Note
In this capture, you see CDP frames from three different interfaces. This is because the firewall interface used is a port-channel with three members: Each member to a different switch port.
Conclusion
While this solution is by no means as easy as “show cdp neighbors”, it will give you the same information if you’re in a pinch and really need to know what’s on the other side of that wire.
Be the first to comment on "CDP on an ASA (To Some Extent)"